Wow. It's been over a year since I've uploaded anything for the blog. Time to catch up on some things.
Decided to restore the wheels I have on my car. Sounds simple enough right? Well, for me that can easily snowball into a big project so I might as well point out that, despite doing this myself, there are cheaper and easier ways to have your wheels restored. Most of my previous sets of wheels were professionally restored by a company called Master Wheels (02-875-1199 look for Edwin), located in Las Pinas (Metro Manila, Philippines) which does excellent work for a very reasonable price. However the level of detail I wanted to get into is a little bit beyond what they can offer.
So let's get started. The wheels I'll be working on are my 1984 production date 15x7 +20 offset Rays Engineering Volk Racing Artisan Spirit wheels.

While they look good when mounted on the car, and viewed from several feet away, a closer look reveals that the 30 year old wheels had seen better days. The color finish is not original either, they had been repainted a number of times in the past since it was a trend of sorts to have the gold center polished lip look.


These wheels are 3 piece split wheels. The center and the inner and outer barrels all separate. After having the tires dismounted the first order of business was to split the wheels up. It takes a considerable amount of force to break loose the allen bolts that hold these wheels together. Use at least a half inch drive deep wall socket and a good quality allen wrench. I first attempted it using a 1/4 inch drive socket set only to be rewarded with the socket splitting in half! Soak all the bolts with WD-40 and crack them loose with a power handle. Once they are free a socket will make quick work of it. A few taps with a piece of wood may be required to free the center, and a cutter will help split the barrels which are also held together with silicone.

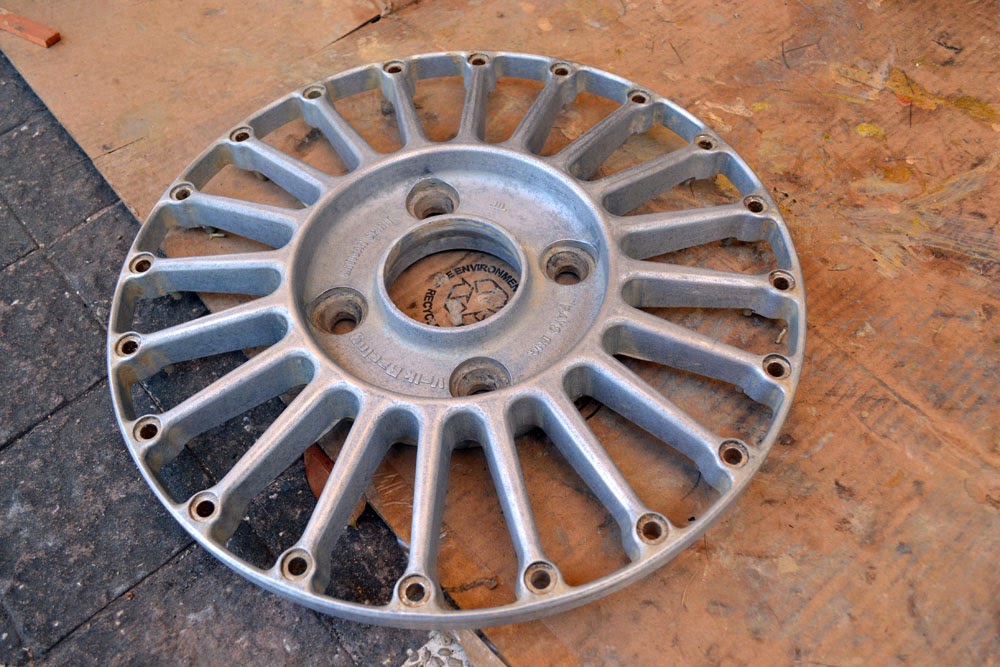
Once apart there are two jobs to be done. Clean up the barrels which are bare aluminum (polished on the outside) and strip the paint off the centers. Does not really matter what you do first, I decided to strip the centers first since that's the more difficult task.
Like eating your veggies first before the meat. There are a few methods available to do this, Media blasting (the more generic term for Sandblasting) is an option specially in other countries where the service is readily available, but you have to be careful not the damage the aluminum. My preferred method in this case would be to chemically strip the centers. Although messy, this is the cheaper method and the least likely to damage anything. 1 Liter of Stripsol (brand) paint stripper, a paint brush to apply and an assortment of things to scrape with will be all you need. Be sure to wear gloves, although the burning sensation you'll feel when the paint stripper contacts your skin will remind you in case you forget.

My technique here is to apply a liberal amount of Stripsol (think of it like how much sauce you'd put on Pasta) and let it work it's magic on the paint. Others suggest to rough up the surface with sandpaper to give the chemical something to bite into, but in my experience it does not seem to make any difference whether you do or not. Without doing anything you'll see it start to eat the paint away.
After letting it sit for a few min. I work the Stripsol into the paint using an old tooth brush. Let it sit for a few more min and you'll see the old paint start to drip down. I cut a few small pieces of wood to use as a scraper to help with this, then hose it out with water to neutralize the paint stripper. This is what they centers looked like after one round.
There was at least 2 different coats of gold paint on the wheels, and the original black center silver spokes paint the Artisan Spirit wheels came in so we didn't get it all off in one round. After letting the centers dry I re-applied the Stripsol and did the same thing all over again and this was the result.
Whatever paint residue left there will still be soft because of the paint stripper. To finish them off, I used a Scotchbrite pad and soapy water to scrub it all down to clean bare aluminum.
This is the finished result.
The next thing requiring attention were the barrels. While they seemed fine when the wheels were together, it was not the case when they were taken apart. The in between of the barrels had a significant build up of dirt same with the edges of wheels where the tire bead sits. While aluminum does not rust, it can corrode in the right conditions which results in pitting which was starting to occur in some places.
Using a metal chisel, I carefully scraped off the thick dirt build up. This had already hardened into a sort of scale.
The three piece wheels are sealed at the joint using a sealant of some sort. Over time this sealant can become hard and start to leak air. In fact one of the reasons that pushed me to do the restoration was that I had a very slow air leak out of one wheel, which was not due to any fault of the tires, nor could it be traced when I had the wheel dunked in a tank of water to look for air bubbles. But it was losing air at around 5 psi a week. The previous owner of the wheels likely had the same problem as there were two layers of sealant in the wheels, the white stuff is what Rays Engineering originally put in there (also tells me that the barrels of the wheels have never been apart) and an extra layer of clear (well it's sort of yellowed now) silicone on top. Careful work with a blade will make short work of that.


The final step would be to spray the barrels with WD-40 (love this stuff) and scrub them with a Scotchbrite pad. This will remove whatever crap maybe on the the aluminum. Dirt, tape residue, rubber bits where the tire bead sits, old stickers (would save them if they were in readable but they were not) and the mounting residue from old wheel weights.
My wheels were in pretty good condition but one of the outer barrels had a little bit of curb rash courtesy of one of the previous owners. Careful work with the flat part of a file will get that back into shape. Use WD-40 to lube it to minimize the damage.
After all that work, I finally had my wheels down to the bare aluminum. I really wanted to just reassemble them like this, but this would be OK only for a show car. I like to drive my car of course, so bare aluminum is not exactly the best choice for that. The wheels will need a protective finish in order make sure they last for another 30 years and more. In Part 2, we finish the wheels and reassemble them.